<Transfer Learning & Fine Tunning>
# 전이 학습(Transfer Learning)은 기계 학습에서 사용되는 기술 중 하나로, 한 작업에서 학습한 모델의 지식을 다른 관련 작업에 적용하는 것을 의미
# 세밀 조정(Fine-tuning)은 전이 학습의 한 형태로, 미리 학습된 모델을 가져온 후 일부 레이어의 가중치를 고정시키고 일부 레이어의 가중치만 업데이트하여 새로운 작업에 맞게 모델을 미세 조정하는 과정으로, 이를 통해 새로운 작업에 더 잘 맞는 모델을 얻을 수 있다.
<개와 고양이 분류를, 이미 잘 만들어진 뉴널네트워크를 활용하여, 성능을 올려보자>

Stage 1: Install dependencies and setting up GPU environment
# 구글 Colab 실행시 우측 상단에 화살표를 눌러 런타임 유형을 변경할수 있다.

# 유료 버전이라면 더 성능좋은 GPU를 선택하면 되고, 무료 버전이라면 T4 GPU로 설정 후 진행.
# GPU 환경이 아니라면 10분이면 끝날 작업을 1시간 동안 돌려야 할수도 있음

Downloading the Dogs vs Cats dataset
--2024-04-19 00:42:54-- https://storage.googleapis.com/mledu-datasets/cats_and_dogs_filtered.zip Resolving storage.googleapis.com (storage.googleapis.com)... 74.125.199.207, 74.125.142.207, 74.125.20.207, ... Connecting to storage.googleapis.com (storage.googleapis.com)|74.125.199.207|:443... connected. HTTP request sent, awaiting response... 200 OK Length: 68606236 (65M) [application/zip] Saving to: ‘./cats_and_dogs_filtered.zip’ ./cats_and_dogs_fil 100%[===================>] 65.43M 151MB/s in 0.4s 2024-04-19 00:42:54 (151 MB/s) - ‘./cats_and_dogs_filtered.zip’ saved [68606236/68606236]
Stage 2: Dataset preprocessing
Import project dependencies
'2.15.0'
Unzipping the Dogs vs Cats dataset
Seting up dataset paths
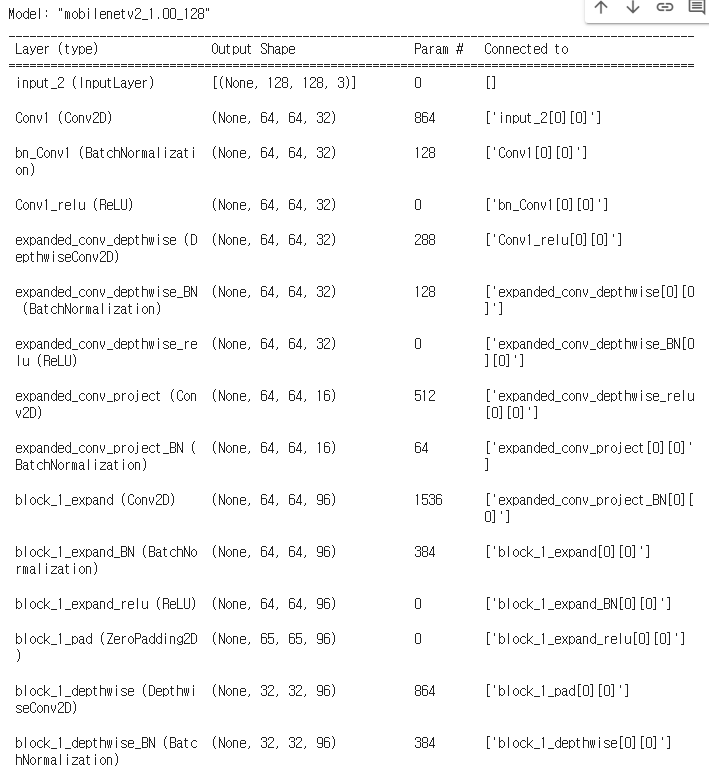
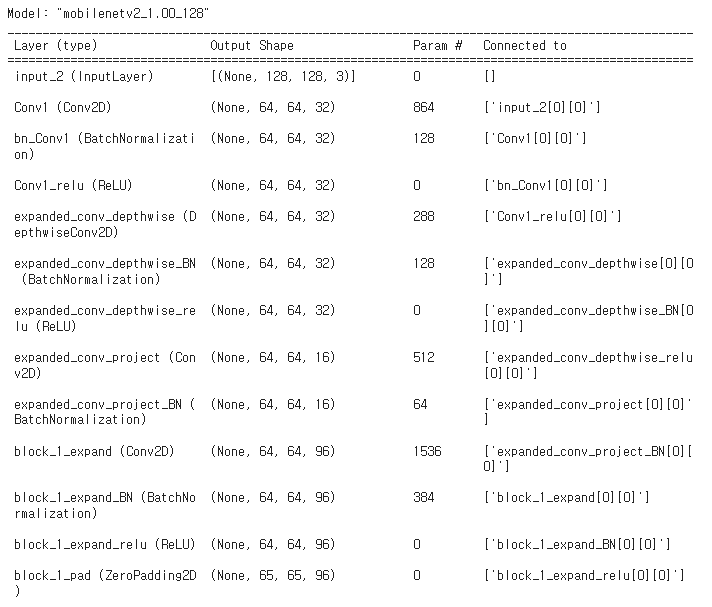
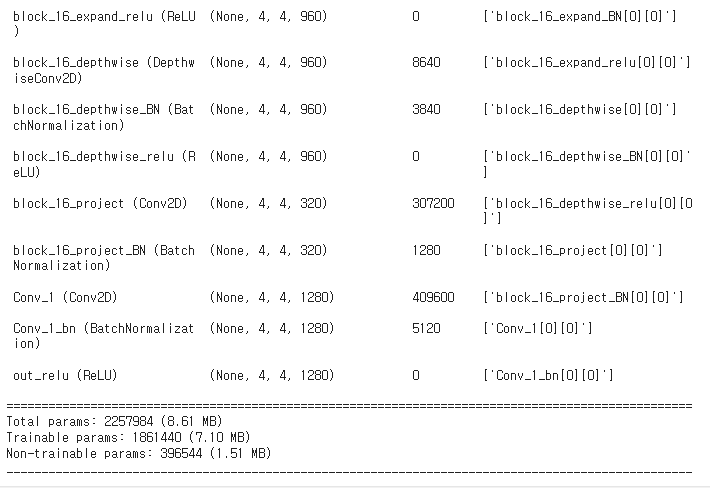
Building the model : MobileNetV2 를 활용
tf.keras.applications.MobileNetV2 | TensorFlow v2.16.1
Instantiates the MobileNetV2 architecture.
www.tensorflow.org
Loading the pre-trained model (MobileNetV2)
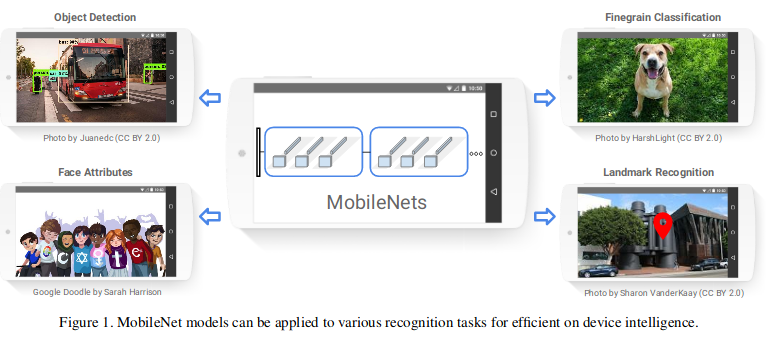
# 모바일이나, 임베디드에서도 실시간을 작동할 수 있게 모델이 경량화 되면서도, 정확도 또한 많이 떨어지지 않게하여, 속도와 정확도 사이의 트레이드 오프 문제를 어느정도 해결한 네트워크 입니다.
Downloading data from https://storage.googleapis.com/tensorflow/keras-applications/mobilenet_v2/mobilenet_v2_weights_tf_dim_ordering_tf_kernels_1.0_128_no_top.h5 9406464/9406464 [==============================] - 0s 0us/step

Freezing the base model
Defining the custom head for our network
Defining the model

Compiling the model
Creating Data Generators
Resizing images
For example: MobileNet (architecture that we use) supports: (96, 96), (128, 128), (160, 160), (192, 192), (224, 224).
Found 2000 images belonging to 2 classes.
Found 1000 images belonging to 2 classes.
Training the model
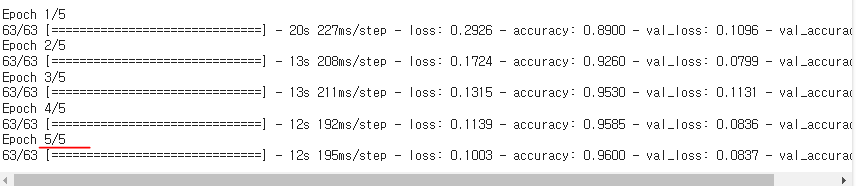
Transfer learning model evaluation

# 이제 임의의 강아지 혹은 고양이 파일을 첨부해 보면 예상한 결과가 출력된다.
# 현재 내옆에서 자고있는 우리집 강아지 사진을 카카오톡으로 다운받아 업로드 해보자.


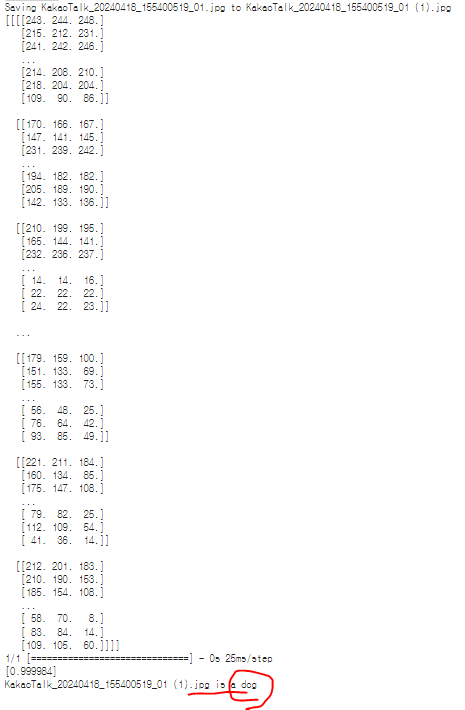
ㄴ 강아지로 예측한걸 볼수있다.
< Fine tuning >
There are a few pointers:
- DO NOT use Fine tuning on the whole network; only a few top layers are enough. In most cases, they are more specialized. The goal of the Fine-tuning is to adopt that specific part of the network for our custom (new) dataset.
- Start with the fine tunning AFTER you have finished with transfer learning step. If we try to perform Fine tuning immediately, gradients will be much different between our custom head layer and a few unfrozen layers from the base model.
Un-freeze a few top layers from the model


154
Compiling the model for fine-tuning
Fine tuning
Epoch 1/5
63/63 [==============================] - 22s 212ms/step - loss: 0.2129 - accuracy: 0.9315 - val_loss: 0.0966 - val_accuracy: 0.9660
Epoch 2/5
63/63 [==============================] - 13s 200ms/step - loss: 0.1638 - accuracy: 0.9330 - val_loss: 0.1468 - val_accuracy: 0.9570
Epoch 3/5
63/63 [==============================] - 13s 204ms/step - loss: 0.1087 - accuracy: 0.9585 - val_loss: 0.1173 - val_accuracy: 0.9640
Epoch 4/5
63/63 [==============================] - 13s 202ms/step - loss: 0.1065 - accuracy: 0.9610 - val_loss: 0.1868 - val_accuracy: 0.9510
Epoch 5/5
63/63 [==============================] - 13s 204ms/step - loss: 0.0739 - accuracy: 0.9785 - val_loss: 0.1452 - val_accuracy: 0.9670
ㄴ Fine tunig 까지 완료
딥러닝 마무리 #
'DEEP LEARNING > Deep Learning Library' 카테고리의 다른 글
| DL(딥러닝) : Facebook의 Prophet 활용한 시계열 데이터 학습 & 예측 (2) | 2024.05.01 |
|---|---|
| DL(딥러닝) : 데이터 증강 (Augmentation) 학습 (0) | 2024.04.30 |
| DL(딥러닝) : CNN (Conv2D, MaxPooling2D, Flatten, Dense) 필터링으로 정확도 높이기 (0) | 2024.04.30 |
| DL(딥러닝) : Tensflow의 Fashion-MNIST 활용(DNN) (2) (0) | 2024.04.30 |
| DL(딥러닝) : Tensflow의 Fashion-MNIST 활용(DNN) (1) (0) | 2024.04.30 |