반응형
< AWS boto3 로 Rekognition
사용하여 객체 감지(Object Detection) 하기 >
# Amazon Rekognition 이란?
- 애플리케이션에 고급 컴퓨터 비전 기능을 쉽게 추가할 수 있는 클라우드 기반 이미지 및 비디오 분석 서비스
- 참고 : https://docs.aws.amazon.com/ko_kr/rekognition/latest/dg/what-is.html
Amazon Rekognition이란 무엇인가요? - Amazon Rekognition
이 페이지에 작업이 필요하다는 점을 알려 주셔서 감사합니다. 실망시켜 드려 죄송합니다. 잠깐 시간을 내어 설명서를 향상시킬 수 있는 방법에 대해 말씀해 주십시오.
docs.aws.amazon.com
# 이제 직접 사용하여 객체 감지를해보자
- 주로 사진 파일을 분석하여 이미지에 맞는 태그 메시지를 보여준다.
- 바로 이전 작성하였던 프로젝트에 이어서 작성 (참고 : https://sorktjrrb.tistory.com/170)
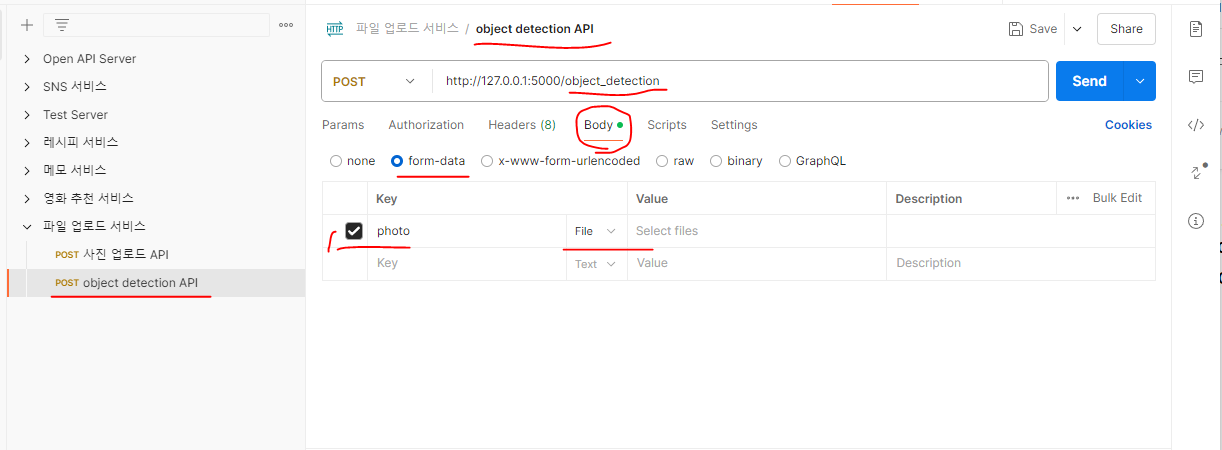
- Postman을 실행하여 API 설계 및 리퀘스트 생성
# 이제 Visual Studio Code를 실행하여 코드 작성
- resources 폴더 안에 rekognition.py 라는 파일을 생성하여 작성
※ boto3 설치되어 있지 않다면 install하고 작성해야함
from flask import request
from flask_restful import Resource
from datetime import datetime
import boto3
from config import Config
class ObjectDetectionResource(Resource) :
def post(self) :
if 'photo' not in request.files :
return {'result' : 'fail',
'error' : '사진은 필수입니다.'}, 400
file = request.files['photo']
if 'image' not in file.content_type :
return {'result' : 'fail',
'error' : '이미지 파일을 업로드하세요.'}, 400
current_time = datetime.now()
file_name = current_time.isoformat().replace(':','_') + '.jpg'
file.filename = file_name
# rekognition 서비스를 이용하려면,
# 먼저, S3에 이미지파일을 업로드 해놔야 한다.
client = boto3.client ('s3',
aws_access_key_id = Config.AWS_ACCESS_KEY,
aws_secret_access_key = Config.AWS_SECRET_ACCESS_KEY)
try :
client.upload_fileobj(file,
Config.S3_BUCKET,
file_name,
ExtraArgs = {'ACL' : 'public-read',
'ContentType' : 'image/jpeg'})
except Exception as e :
return {'result' : 'fail',
'error' : str(e)}, 500
# 리코그니션을 이용한다.
# 하단에 작성한 detect_labels 함수를 self.하여 사용한다.
label_list = self.detect_labels(file_name, Config.S3_BUCKET)
return {'result' : 'success',
'labels' : label_list}
def detect_labels(self, photo, bucket):
client = boto3.client('rekognition',
'ap-northeast-2',
aws_access_key_id = Config.AWS_ACCESS_KEY,
aws_secret_access_key = Config.AWS_SECRET_ACCESS_KEY)
response = client.detect_labels(Image={'S3Object':{'Bucket':bucket,'Name':photo}},
MaxLabels=10,
# Uncomment to use image properties and filtration settings
#Features=["GENERAL_LABELS", "IMAGE_PROPERTIES"],
#Settings={"GeneralLabels": {"LabelInclusionFilters":["Cat"]},
# "ImageProperties": {"MaxDominantColors":10}}
)
print('Detected labels for ' + photo)
print()
print(response['Labels'])
label_list = []
for label in response['Labels']:
print("Label: " + label['Name'])
label_list.append(label['Name'])
return label_list
# app.py 에도 경로 설정
from flask import Flask
from flask_restful import Api
from resources.image import FileUploadResource
from resources.rekognition import ObjectDetectionResource
app = Flask(__name__)
api = Api(app)
# 경로와 리소스를 연결하는 코드 작성
api.add_resource( FileUploadResource , '/upload')
api.add_resource( ObjectDetectionResource , '/object_detection')
if __name__ == '__main__':
app.run()
# 테스트해 보자
- Postman 실행하여서 소행성 사진을 하나 올려서 SEND
- 사진 분석 결과를 메시지로 출력하는것 확인
- VSC에도 출력되는것 CMD창에서 확인 가능


다음 게시글로 계속~!
728x90
반응형
'API 개발 > AWS S3 & Rekognition API 파일 업로드' 카테고리의 다른 글
| AWS rekognition : AWS rekognition 활용한 얼굴 비교 API (0) | 2024.06.25 |
|---|---|
| AWS rekognition : AWS rekognition 활용한 얼굴 인식 API (0) | 2024.06.25 |
| Restful API : AWS boto3 로 S3에 파일 업로드 하기 (1) | 2024.05.30 |
| AWS S3 : S3 스토리지 사용 방법 (버킷 생성) (0) | 2024.05.28 |